
Setting up a 3-way switch system with multiple lights can seem daunting, but with the right guidance, it becomes a manageable project for DIY enthusiasts and experienced electricians alike. Whether you’re adding a new lighting setup or replacing outdated wiring, understanding the process is essential for safety and functionality.
Understanding the Basics of 3-Way Switch Wiring
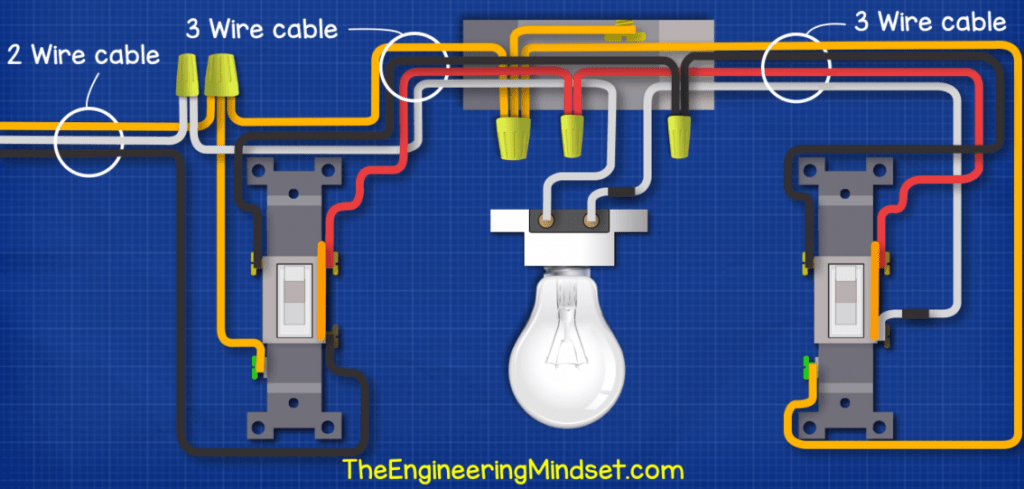
A 3-way switch allows you to control a light fixture from two different locations. When multiple lights are involved, wiring becomes more complex but follows similar principles. The key components involved include the traveler wires, the common wire, and the switch legs connecting the switches to the lights.
Tools and Materials Needed
- Two 3-way switches
- Appropriate gauge wire (typically 14/3 or 12/3)
- Wire strippers and screwdrivers
- Voltage tester
- Wire nuts
- Additional light fixtures and switch boxes
Step-by-Step Instructions
1. Turn Off Power
Before starting, switch off the circuit breaker to avoid electrical hazards. Use a voltage tester to confirm that the power is off to the wiring area.
2. Plan Your Wiring Path
Identify the location of the power source, the switches, and the lights. For multiple lights, decide whether they will be wired in series or parallel, keeping in mind that parallel wiring ensures all lights receive full voltage.
3. Run the Cables
Run the appropriate cable from the power source to the first switch, from the switches to the lights, and between switches as needed. Use 14/3 or 12/3 cable for traveler wiring, which contains a hot, neutral, and two traveler wires.
4. Wire the Switches
Connect the common terminal of the first switch to the power source hot wire. Attach the two traveler wires to the traveler terminals of both switches. The common terminal of the second switch connects to the hot wire leading to the lights. For multiple lights, connect the light fixtures in parallel, ensuring each has its own neutral and hot connections.
5. Connect the Lights
Wire each light fixture to the hot and neutral wires, ensuring that they are wired in parallel. The ground wire should be connected to all switches and fixtures for safety.
6. Complete the Circuit and Test
Once all connections are secure and wiring is neatly organized, restore power at the circuit breaker. Test the switches both individually and together to ensure the lights turn on and off correctly from both locations.
Additional Tips for Success
- Always verify your wiring with a voltage tester before touching any wires.
- Use wire nuts to secure wire connections and prevent loose contacts.
- Label wires if necessary for easier troubleshooting.
- If you’re unsure about your wiring skills or local electrical codes, consult a licensed electrician.
For a detailed guide and step-by-step visual instructions, check out how-to-wire-a-3-way-switch-with-multiple-lights. This resource offers comprehensive insights into wiring multiple lights with a 3-way switch system.
Visit Our Homepage
For more helpful electrical tips and tutorials, visit our homepage.
Wiring a 3-way switch with multiple lights can improve your home’s convenience and aesthetic. With patience and proper safety precautions, you’ll be able to complete this project successfully and enjoy the benefits of versatile lighting control.